I’ve been evaluating Photo to Movie from LQ Graphics as a tool for digital storytelling. My favourite application is iMovie HD. It’s not perfect but better the devil you know – and I know iMovie pretty well now and still discover tricks that make me think “how clever”.
When Apple rewrote iMovie for iLife 08 it presented a host of problems for digital storytellers. The most obvious one is the total lack of a timeline in the conventional video editing style. It can be pressed into use for digital storytelling but for a new user there is a serious lack mouse functions for stills. Almost all of the digital stories told in my workshops are told by beginners using still images. Things improved in iLife 09 but not enough for me to start using it over the HD version.

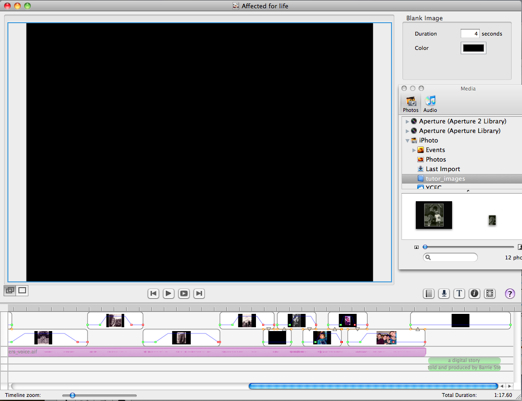
Building Affected for Life? in Photo to Movie
Last month someone alerted me to Photo to Movie. A package written specifically for still images. It has a timeline and is capable of creating something more sophisticated than a simple slideshow by the use of highly configurable zoom and pan functions. It integrates quite well with iTunes and iPhoto, and so things looked hopeful as I read the help files and absorbed the basic functions. There are also Mac and Windows versions. But would it live up to my hopes?
So I took the tutorial section of my digital story Affected for Life? that I use in all of my workshops. It’s a section that employs most of the basic effects that I teach. It’s very easy, when you know exactly how the story and images fit together to start at the beginning and build the story from left to right on a timeline and end up with a polished product in a short time. Photo to Movie allowed me to do this quite simply. The basic slide show was finished in no time at all. But, most digital stories are not as well rehearsed as my tutorial. Images need to be added and removed; durations shortened and lengthened; effects added and removed, all without upsetting the basic timing of the images which have been carefully placed to appear at a specific word or even syllable. Going through the editorial process is what really tests a piece of software.
This is what I found when I started hacking at my slideshow.
To replace an image in iMovie HD, click on it and then “show photo settings”. Delete the image and then drag the new image from the media browser to take it’s place in the timeline. It will pick up all the attributes of the image just deleted. In Photo to Movie, ctrl-click the image in the timeline and select “replace photo …” At this point a finder window opens in the Pictures folder, not the media browser which is where all my images are stored. So I was unable to tell if a replacement image would work like iMovie HD. A new photo dropped from the media browser (ie iPhoto) into the timeline is given only the default settings. This is a process that is repeated many times in the storytelling process which is why this limitation is a concern.

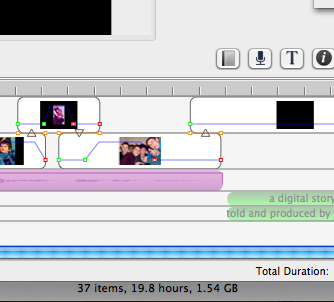
The Photo to Movie timeline
There’s no way of selecting all the images on the Photo to Movie timeline and moving them along it together. In fact the only way of moving everything down the timeline is to insert a blank image at the start. There is a handy “insert blank image” function to do this easily, which is also critical because there isn’t a fade to black transition. I had to insert a blank image and set up a cross dissolve in and out of it to create a fade to black, fade from black transition.
All images in Photo to Movie are allocated a series of default keyframes, preset for standard zooming (Ken Burns Effect). The default can be set for no effect but the keyframes remain. I found they “got in the way” of setting image duration. eg When I shortened a clip the time between the last and previous keyframe was shortened. The rest remained at the same place. Changing one of the keyframes inside the image also changed the duration of the clip and hence the relative timing of all subsequent images on the timeline. I would prefer keyframes that moved relative to the clip duration, or at least the option to work that way, if the current arrangement is important to other slideshow creators. I found the whole process so irritating that it was a deal breaker for me. The timeline is quite fiddly and I couldn’t imagine some of my workshop participants clicking their mouse pointers and dragging at the right place. Control of zooming and panning in an image is much more comprehensive than in iMovie but also more complicated. I would have preferred a better range of options elsewhere and fewer zooming choices.
Transitions in Photo to Movie are created by overlapping images, a process which again disturbs the timing in the rest of the timeline. In iMovie HD there are transitions that retain the timing. Also there’s no slip editing function. For me allowing adjustments and effects that retain the initial timing of images in the timeline is very important to new learners. It’s frustrating for them to be constantly rearranging images after trying out a creative idea. They often just sit tight and stop developing their story preferring to live with what they have.

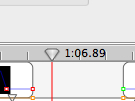
timing in fractions of seconds
I also noticed that the timeline is calibrated in seconds and fractions of a second when we all know that conventionally video is timed in seconds and frames.
At this stage I am sceptical about the suitability of Photo to Movie as the main workshop tool for my digital storytellers so as a comparison I switched over to the new iMovie 8 and built my tutorial film in there. Despite it’s shortcomings (watch this space for a similar review) I felt more comfortable about teaching it’s functions to new users. I’m sure there are many users who are delighted with Photo to Movie but I don’t think it’s for me at this stage.
Why am I doing this? Well iMovie HD is no longer available and under Snow Leopard has a fatal bug in the way the app previews still images in the timeline. There are workarounds BUT who knows what will be the next bug/flaw that emerges as the operating system grows away from a much loved but unsupported application? It will soon be time to move on.
